Showing posts with label before and after. Show all posts

Sunday, February 21, 2010

WEEKs 81-87: Hall & (c)oats

Another project about 97.2%(*) done! We painted, we improvised...oh, and we created an entry/hall closet where none existed. From start to finish, it took many steps:

  • HVAC installed in the hall closet
  • installed white bifold door to hide energy star air conditioning unit
  • covered up the hole in the ceiling with a return register
  • repaired and painted the broken trim
  • installed/painted 3 solid core doors
  • painted the walls in "Smooth Driftwood"; painted the moldings, trim, and baseboards in white; we even painted the cover of the electrical panel to lessen the eyesore-ness of it all.

PMH wasn't blessed with an entry closet. What appears to be one there on the left had been repurposed as the HVAC closet. So we scratched our heads for where to place our shoes and jackets that seemed to pile up everywhere. The solution came when we installed the IKEA TJUSIG in white up high and the IKEA LOGGA down low for shoes.


Here's a close-up of our shoe rack that we hacked by using what IKEA markets as a three-hook jacket hanger. By purchasing 2 of the hangers and mounting them side by side, we can easily hang a few pairs of shoes. By storing shoes vertically, we have recaptured valuable inches from our oh-so-narrow hallway. Tah-Dah!

(*) We say 97.2% done because we still need to paint the bi-fold door in high-gloss white and install some groovy hardware on it.
Bookmark and Share

Friday, November 6, 2009

DIY:salvage to art

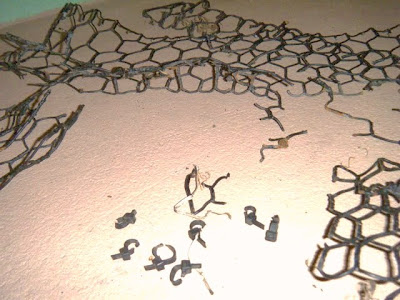
1st time making a metal sculpture...ok, 1st time making ANY sculpture. In the process, I gained aching hands and mucho respect for anyone who works with metal. It all started when M. decided to finally remove a mud-covered rope that was tied onto our seawall (yup, it's been there all this time). At the other end of that rope, we found a flat crushed derelict crabtrap that had been abandoned for who-knows-how-many years. M. hosed off the excess muck and left it to dry in the yard. I don't know how I convinced him to let me use it for a "project", but after a couple hours, we had our 1st DIY salvage art piece. If I can make a manatee wall hanging out of a derelict crabtrap, anyone can. Here's how:
1. CLEAN: Using pliers, I removed the excess debris and heavily damaged parts from the crabtrap.


2. PLAN: I stared at the crabtrap for a LONG time until inspiration hit me (ow!). Using sharpie marker on newspaper, I sketched out a simple manatee silhouette. I put the template under the crabtrap to trace the outline onto the metal.

3. SCULPT: Using pliers, I cut out a rough shape, following the manatee outline as best I could. Then, using jute rope (found at Michael's craft store), I traced the manatee outline more carefully. I tied rope knots along the way to keep the rope in place [while singing connect-the-dots-la-la-la].


4.FINISH: I used a round nose plier to bend down the pointy metal ends safely and coated the whole manatee with leftover silver spraypaint. My sis encouraged me to add an eyeball, so I sewed on an old button. Finally, I reused the line rope that once tethered it to our seawallL: I snipped it and knotted it to become a hanger so it is ready to be hung up. Voila: salvage art.

This week, my awesome sis took our manatee over to the Hillsborough County Fair where it will be displayed Nov 4th - Nov 8th, as part of the 2009 Recycled Yard Art contest. We got our fingers crossed, but are just as happy to be participating.

P.S. Safety 1st: Despite using non-slip gloves and a foam-handled pliers set, my hand were aching. I took breaks often to let my hands rest.
Bookmark and Share

Tuesday, October 6, 2009

Shameless Plug!

We need your help and we need your votes! A few months ago, our big patio makeover landed us the honor of being the 1st winners in the summer-long DIY contest over at One Project Closer. Now, all of the weekly winners (including us) are in the running to win an even bigger prize: a $150 gift card to a home improvement store. We’re not usually so competitive, but a gift card is at stake here -- a gift card people! There is long to-do list at Pacha Mama House that can be tackled if we win that gift card. Please vote now and vote often! If you forgot what our patio makeover looked like, here’s a refresher:

BEFORE (oh no!):
AFTER (boo yeah!)


Vote for us here!
Bookmark and Share

Monday, June 8, 2009

WEEKS 44-47: Pacha Mama or Bahama Mama?

The past few weeks have been busy around Pacha Mama House, but you might not know it to look at all the house projects still left to do. Ha! J. went on a 4-day road trip from Plattsmouth, Nebraska to Tampa Florida and came back with her sister, and canine-nephew (Elmo) and canine-niece (Zoe). The arrival of houseguests was a definite motivator to get a few more things checked off the big ol’ honey-do list. Yay! Meanwhile, this past weekend, M. & I celebrated our 4-year wedding anniversary. We honored the occasion by taking a day cruise to the Bahamas!

  • DECISIONS: decided against beadboard in MBA; decided to have seawall repaired (instead of rebuilt) next month
  • LABOR: we participated in neighborhood yard sale and spent many hours yardening (all that stuff that happens before you can do gardening); M. finished linen closet install and the towels are no longer homeless!; Also, M. has moved into his new shed and begun the mancave conversion; our fave contractor installed all our interiors doors; J prepped the house for our first houseguest: welcome to N., Elmo, & Zoe!
  • MAJOR PURCHASES: Anderson storm door w/retractable screen; guest room ceiling fan

Here’s a pic of us 4 years ago at our Caribbean destination wedding…aww...such innocent house virgins! [before]

Here’s a pic of experienced DIYers taking a weekend off of houseprojects by taking a Caribbean cruise! [after]


J. thinks she could get used to this...


M. is such a (coco)nut in Freeport, Bahamas!

Sunday, May 17, 2009

DID-IT: phatty-oh-patio

We did it: da patio redo! When we moved in, our backyard patio was an unappealing mix of concrete slab, bricks, and mismatched stepping-stones. After the brick layer was removed, we discovered more concrete slab underneath. In order to fit our 14 ft long swimspa, our contractor had to extend the patio by pouring yet another four feet of concrete. Yech! We hated the idea of our backyard turning into a concrete ocean, not to mention that the original concrete was cracked, rough and had a sun-bleached brick pattern on it. Our long term plan is to someday replace all the concrete with sleek interwoven pavers or tile. Our short term solution, however, had to be quick, easy, and DIY! Nothing says fast fix like fresh paint. Here's how we turned our blech concrete slab into our phatty-oh-patio in four steps.


1. CLEAN UP. We used a leaf blower to get all dirt & dust off the slab, then used a long-handled scrub brush to apply concrete cleaner/etcher.


2. PRIME. Using a long-handled roller, we applied a concrete primer/bonder. It goes on clear.


[2.5 RUN don’t walk to the ice cream truck! It’s important to take breaks in hot weather. Sorry for the blurry pic, I was running to get my waffle cone!]


3. PAINT. Use specialized concrete paint (we got ours at Home Depot) and have it tinted to your fave color. Roll on generously.


4. DÉCOR. Add gazebo, furniture, rug, solar lights, and plants.


Here's a few close-up shots:


Wednesday, April 8, 2009

House color: Love & Hate

DA HOUSE IS GREEN! We admit it. We've long been been itching to own a house we could paint any color we pleased. In fact, while house hunting, we made ran in the opposite direction of "deed-restricted" abodes and home-owners associations that might restrict our God-given right to paint our house purple and orange polka dots. Okay, we never intended to be so dramatic, but we did dream of a house that reflected our love of all things tropical, bright and cheery. That's right...we couldn't live in a house painted beige, grey, brown or any other color that didn't perpetually remind us of sunny Florida. Last year, when we bought Pacha Mama House, she was wearing several decades of peeling paint, the top layer of which was dirt-splattered ivory. We labored for color inspiration and got stuck somewhere between key-lime and seafoam green. After many trips to Home Depot to pick up MORE paint samples, we finally agreed on a winner. The painters spent one day to prep and one day to paint. Here's a few lessons we learned along the way:
1. BUY LOTS OF SAMPLES. Those tiny paint swatches look completely different when put on your house. M convinced me it was better to spend a lot of money on samples than a lot of money on repaintin a whole house. Nuf said.

2. COLORS CHANGE WITH DAYLIGHT. After the paint samples dried, we were awed by how different they looked in the shade versus direct sunlight. Thus, we tested on two different walls that got different light exposures.

3. BE BOLD. not boring. Your house is a statement of who you are. If you really are a grey person, then go ahead and paint your house grey - it is true to you. But if you are really a brightly colored person, do not let fear rule your life or your house color.

Our indecisive deliberation:


Pacha Mama House before:


Pacha Mama House after:


No, the irony is not lost on us. In our attempt at a greenovation, we have gone literal. Sheesh!

So far we have had two extreme responses from our neighbors and I quote...
Neighbor 1: "HEY! Why'd you paint your house that ugly color?"
Neighbor 2: "HEY! We love your house color!"

So...do you love it? hate it? Happy Voting!

Our new house color! Survey says?
LIKEY. I'm totally feelin' it.
DISLIKEY. I'm feeling sick just looking at it.
pollcode.com free polls

Sunday, July 27, 2008

WEEK 3: Permit...Permit...Permit!

Week 3: "Permit" was the buzzword o' da week. M. made a grand total of 3 trips to the local permitting office in vain attempts to restore an electrical meter to our house. The house flipper who previously owned our house (prior to the bank owning it of course), had pulled an electrical permit, done 90% of the electrical work, never got a final inspection and thus the permit expired. Now we come in and try to get the same electrical permit re-issued (not a terrible financial cost, but quite the headache!). Until we pass electrical inspection, no power meter...grr. The 1st time M. went to the permit office, he was told that there was no proof that he owned the house so they would not re-issue the permit to him. The 2nd time M. went with official closing papers in hand, and was told that he needed the actual deed to the house (which does not come in the mail for another 45 days). The 3rd time M. went with a printout from the county website showing the deed transfer...3rd time was the charm. We got our electrical permit re-issued! Subsequently, there has been a flurry of electricians bidding up the work that remains to be done to get us to pass inspection...phew!

Meanwhile, our contractor brought in some guys to start work on the back patio. We talked to our neighbors on both sides and begged their forgiveness for loud jackhammering that was to begin early Sunday morning. This is a courtesy folks and I highly recommend it! You can't do anything about construction noise, but you can give the heads-up to neighbors. We are glad we did. WEEK 3 PROGRESS:

  • DECISIONS: Design for back patio pad (site of future screen room)
  • LABOR: (1) M. continued working on the upper kitchen cabinets (2) M. installed new mailbox (3) demo of existing patio has begun!
  • MAJOR PURCHASES: mailbox post, a pedestal bath sink, solar Tiki lights (we couldn't resist b/c they actually flicker!)

MAILBOX BEFORE: Old rusted metal box on old rusted metal post and leaning precariously at a 45 degree angle...how sad!


MAILBOX AFTER: Yowsers! New weatherproof and rustproof mailbox has locking compartment which prevents identity theft and is oversized to allow a vacay's worth of mail to discreetly accumulate. Yes, we know the mailbox is plastic, but it is durable and thus long-lasting. The mail post is cedar which is durable for outdoors. As for going green...well, at the bargain price of $865, we just can't afford the FSC-certified mailbox and post of our dreams by Semi-good. Thus the compromises begin...

P.S. The metal mailbox and post WERE recycled for scrap metal by a neighbor. It did not end up in a landfill. Hooray!

Monday, July 21, 2008

Look what we did: what started the DIY madness!

While reading through Houseblogs.net, we just found out about a contest (Story Here) to win a TrueValue Hardware store (http://www.startrightstarthere.com/) gift card for $300! Yippee! I love winning stuff and I love bragging about my hubby M., so here goes...
Our fave DIY project is part of our first home - an 830 sq ft 2BR/2BA condo in Austin, TX which we loving renovated from 2005-2007. The tiny galley kitchen featured cabinetry and appliances that were over 20 years old. Since nothing was salvagable, M. was forced to completely gut it and start from scratch. New features included: new bright green paint, new high-end appliances, new countertops and backsplash, new flat-front cabinets, new contemporary hardware, new textured flooring. Notice the cookbook nook at the end of the upper cabinetry. Hubby put that in just for me because I always talked about wanting one! Looking back, it was kinda a simple project. Everything was in-stock, off-the shelf materials, no special order nuthin. But at the time, it was the biggest scariest project for us. This kitchen redo really gave us the confidence to become DIY enthusiasts!

BEFORE (eww!):
DURING (ooh!):
AFTER (aah!):

This post was written for Houseblogs.net as part of a sweepstakes sponsored by True Value.
Related Posts Plugin for WordPress, Blogger...